After that last unit of Jungle cannibals for my tribal Africa project I thought it wast best to try to finish of all my half painted warriors for this project and so I painted these small units of Zulu warriors. One unit of unmarried Zulus and one veteran unit (white shields.)
They are plastic miniatures from Warlord Games.
I could have given them some more time on the paint job but then again it felt like ages I actually had a game with these so until I really get hooked on tribal wars again this will do.
Not the best pictures ether. :(
Tuesday, 20 January 2015
Monday, 19 January 2015
New paper tent
I made a new variant of my paper tent. I made the tent somewhat bigger and I think its starts to look descent in size now.
I only needs to make the roof part a little bigger.
Oh well, I guess I will have a whole camp by the time Im happy..
The tent got evidently a little damaged in my bag when I carried it home after last time at the club where I glued it together. But I think its still good enough to keep. Better be more careful when transporting these and not just lump it in the bag with the rest of the stuff there...
I only needs to make the roof part a little bigger.
Oh well, I guess I will have a whole camp by the time Im happy..
The tent got evidently a little damaged in my bag when I carried it home after last time at the club where I glued it together. But I think its still good enough to keep. Better be more careful when transporting these and not just lump it in the bag with the rest of the stuff there...
Friday, 16 January 2015
Cut out that damned music... or else...
I found some nice miniatures that I just had to have.
The miniatures are from Midlam miniatures, a company to me unknown until recently from their Arabian nights range.
http://www.midlamminiatures.co.uk/arabian-nights/page/1/
The miniatures maybe got more of an fantasy feeling to them then historical but I like them.
They are based on square bases with rounded edges from Victrix.
http://www.victrixlimited.com/online_shop/product_info.php?cPath=32_34&products_id=42
The snake charmer got a double base.
I painted and based the Hashashin to have a darker front and lighter look from the back. I dont think I really pulled that one of as I intended.
I ordered more miniatures from Midlam Miniatures so expect more of this kind in the future...
The miniatures are from Midlam miniatures, a company to me unknown until recently from their Arabian nights range.
http://www.midlamminiatures.co.uk/arabian-nights/page/1/
The miniatures maybe got more of an fantasy feeling to them then historical but I like them.
They are based on square bases with rounded edges from Victrix.
http://www.victrixlimited.com/online_shop/product_info.php?cPath=32_34&products_id=42
The snake charmer got a double base.
I painted and based the Hashashin to have a darker front and lighter look from the back. I dont think I really pulled that one of as I intended.
I ordered more miniatures from Midlam Miniatures so expect more of this kind in the future...
Wednesday, 14 January 2015
Tutoral: Desert hills
I think that we were in need for some new hills for our desert terrain at the club, so I built some.
And I did a tutorial on each step.
Keep in mind that this is the first time I have done hills like this so these are a sort of testrun and next time I might do some things differently. But it works.
I have done these terrain pieces over a couple of days in my basement. The overall time in not much, 5 minutes here and 10 minutes there and you get some nice looking terrain in the end. The things that takes time is to let it dry between each step.
First up a base, some expanded polystyrene and woodbark. All glued together using woodglue.
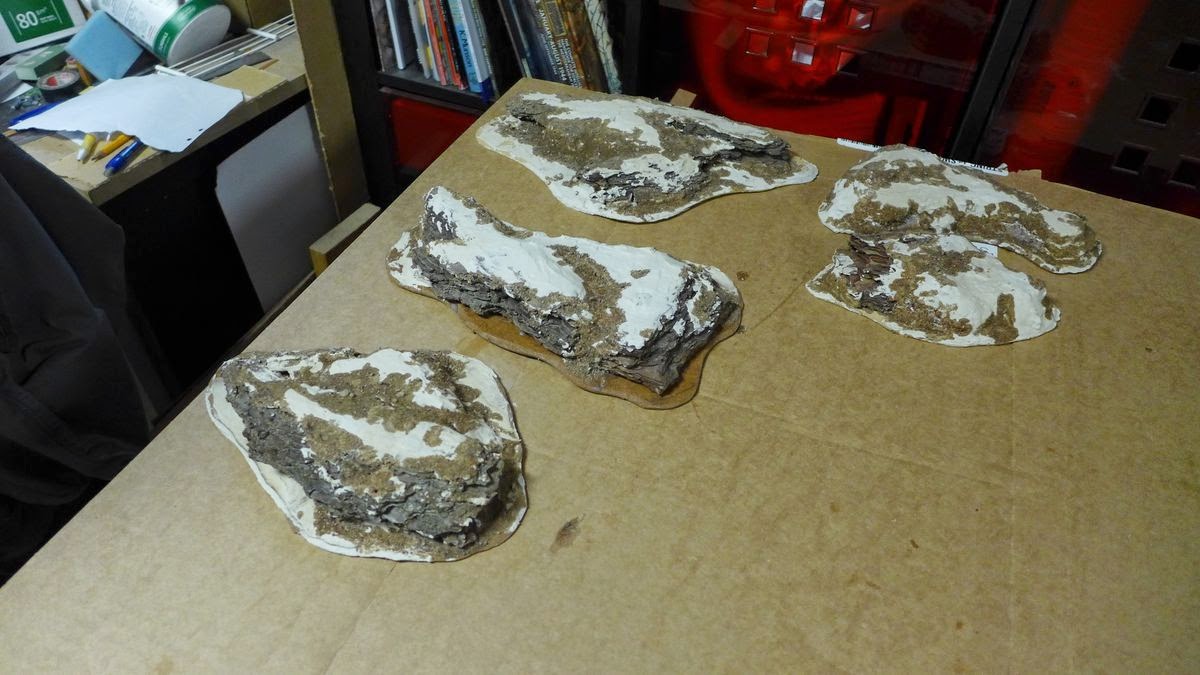
Next I covered the polysterene and some places of the bark with plaster. The plan was to cover the polysterene from the primer later on.
And then I added woodglue and sand on chosen places.
A black priming using a spray can.
I found some places not totally covered with the plaster but I think it will be all right.
Next, a sort of "zenith highlight" using a brown primer at about 45 degrees angle. Leaving the black primer on the bottom part and places "in the shade" on the terrain pieces.
Next up was more woodglue and more sand.
And after this some small patches of flock. This is to get a greater colour variation on the terrain piece more then trying to imitate real hills or cliffs.
And we are done.
With 15mm DAK
10mm Scifi, a Shaltari force
And the main reason that I did them, as terrain for the clubs Crusader project.
So what have I learned?
Next time I will not use expanded polystyrene found in packing materials but the harder ones commonly used as building material/ insulation for houses.
And I might try to use another colour then brown for the highlight but in this Im not sure.
A easy way of doing nice looking terrain non the less.
And I did a tutorial on each step.
Keep in mind that this is the first time I have done hills like this so these are a sort of testrun and next time I might do some things differently. But it works.
I have done these terrain pieces over a couple of days in my basement. The overall time in not much, 5 minutes here and 10 minutes there and you get some nice looking terrain in the end. The things that takes time is to let it dry between each step.
First up a base, some expanded polystyrene and woodbark. All glued together using woodglue.
Next I covered the polysterene and some places of the bark with plaster. The plan was to cover the polysterene from the primer later on.
And then I added woodglue and sand on chosen places.
A black priming using a spray can.
I found some places not totally covered with the plaster but I think it will be all right.
Next, a sort of "zenith highlight" using a brown primer at about 45 degrees angle. Leaving the black primer on the bottom part and places "in the shade" on the terrain pieces.
Next up was more woodglue and more sand.
And after this some small patches of flock. This is to get a greater colour variation on the terrain piece more then trying to imitate real hills or cliffs.
And we are done.
With 15mm DAK
10mm Scifi, a Shaltari force
And the main reason that I did them, as terrain for the clubs Crusader project.
So what have I learned?
Next time I will not use expanded polystyrene found in packing materials but the harder ones commonly used as building material/ insulation for houses.
And I might try to use another colour then brown for the highlight but in this Im not sure.
A easy way of doing nice looking terrain non the less.
Friday, 9 January 2015
Jungle cannibals
Every now and then I at least tries to finish up on some half painted miniatures that have been laying around for far to long.
And this time I finished some jungle cannibals from my Tribal Africa project where I pitted different African tribes together before the introduction of gunpowder.
The miniatures are from North Star.
As the dark miniatures was so hard to get a good picture of I tried a new background and I think you can pick up the details a loot better on the dark miniatures on these here. Enjoy
To bad I havnt even looked at my tribals for ages. There are some nice looking miniatures in the collection.
And this time I finished some jungle cannibals from my Tribal Africa project where I pitted different African tribes together before the introduction of gunpowder.
The miniatures are from North Star.
As the dark miniatures was so hard to get a good picture of I tried a new background and I think you can pick up the details a loot better on the dark miniatures on these here. Enjoy
To bad I havnt even looked at my tribals for ages. There are some nice looking miniatures in the collection.
Wednesday, 7 January 2015
Unboxing - Fireforge Games Mongols
I just bought two plastic boxes from Fireforge Games.
And no, I dont plan to start a Mongol army but rather use bits from here and try to create some Turcomans as mercenaries to my Ayyubid army, but more on that later. What Im here to post now is what's inside the boxes.
The contents of the sprues are rather similar as you can see here. The infantry box got more shields then the cavalry one, but one of the infantry sprues had the same middle section as the cavalry to act as a sort of command.
Im really fine with this and think its a smart move to produce more plastic kits in a simple way but I think it should be known to you.
In the cavalry box you also get 12 horses, one to each rider.
The horses faces looks a little strange to my eyes but its still ok.
So there you go, a small box opening on Fireforge Mongol/ Steppe tribe boxes.
I liked the boxes but think they could have had more variations on the parts. For example all the arrow quivers are identical with the same detail with the deer motif on all of them. The arrows in the quivers looks a little to computer rended with their perfectly same length and straitness.
I have started to glue some of the miniatures together now and will be kitbashing these to get a better Turcoman feeling to them but I think these will be a nice base for convertions.
Edit:
Here you can see the converted and paited results.
Turcoman horsearchers
http://kampgruppe-engel.blogspot.se/2015/03/turkoman-horse-archers-converted.html
Turcoman light infantry archers
http://kampgruppe-engel.blogspot.se/2015/02/turcoman-archers.html
Hope this can help and inspire.
Subscribe to:
Posts (Atom)